- Home
- /
- SAS Communities Library
- /
- SAS Studio Custom Task Tuesday: How to Create a State Map Using Proc G...
- RSS Feed
- Mark as New
- Mark as Read
- Bookmark
- Subscribe
- Printer Friendly Page
- Report Inappropriate Content
SAS Studio Custom Task Tuesday: How to Create a State Map Using Proc GMAP
- Article History
- RSS Feed
- Mark as New
- Mark as Read
- Bookmark
- Subscribe
- Printer Friendly Page
- Report Inappropriate Content
This week we will create a Custom Task that allows the user to create their own map of a State, and upload a dataset containing latitude and longitude coordinates to be put on the map. For the SAS code, I used this example. This task could be easily modified to use maps of countries, for example, instead of states. So, as always, feel free to download and edit as you wish!
This post will show you a few important ways that you can restrict user input, like only allowing numeric variables for Latitude and Longitude, and only character variables for Label. We will also create multiple tabs in our task, one for data and one for additional options.
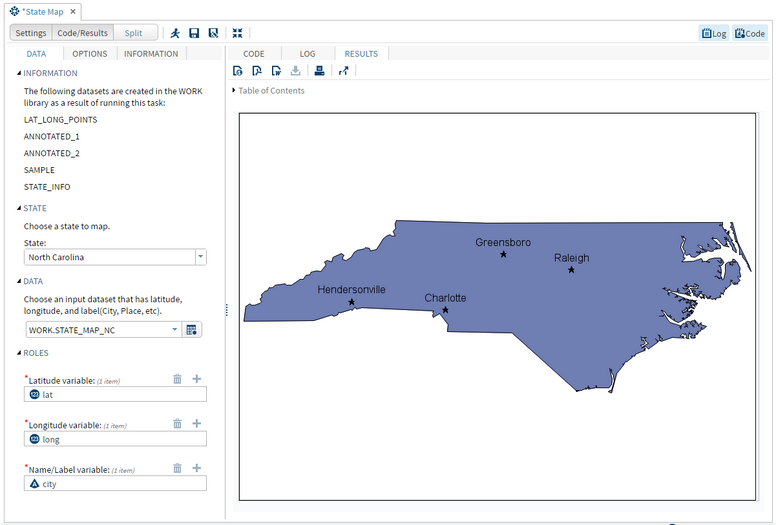
This is what the task will look like when we are finished, along with some example output:
Step 1: Getting Started
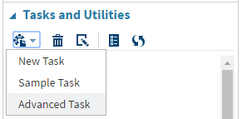
In SAS Studio, under the Task and Utilities section, open a “New Task” as well as the “Sample Task.” We will copy and paste the necessary Velocity Template code from the Sample Task to our task.
Step 2: Naming and Saving the State Map Task
Name: State Map
Description: This task creates a map of the user-specified state, containing points for landmarks that were given in the user’s latitude and longitude coordinate dataset.
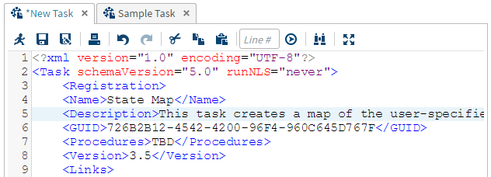
At the top of the VTL code for your New Task, you will need to fill in the Name and Description portions as shown below:
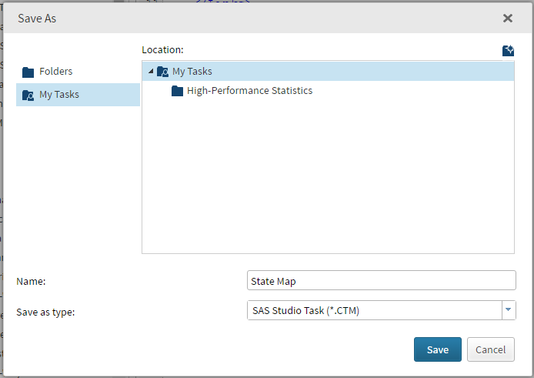
After you’ve done that, you should save this task to your My Tasks folder, so you don’t lose it. Click the button in the upper left corner of the task to bring up this option screen:

Step 3: Creating the Metadata Portion of the State Map Task
To make things easier on ourselves, we are going to steal VTL code from the Sample Task. From our “finished product,” you can see that we are going to use one combobox, one dataset selector, three role selectors, as well as two input text boxes for our title in our options page.
In the metadata portion, the order of the items doesn’t matter very much, as long as they are all there. Find the code that corresponds with these items in the Metadata section of the Sample Task, and copy and paste them into the same place in your task. Edit to code you copied to correspond with what we want as our finished product.
Remember, for our latitude and longitude role selectors we only want to accept numeric variables, and our label role selectors, we only want to accept character variables. In the Role portion of the metadata section, this is done by changing the type. You will use “N” for numeric, “C” for character, or “A” for any.
Your finished metadata portion should look something like this:
<DataSources>
<DataSource name="DATASOURCE">
              <Roles>
<Role maxVars="1" minVars="1" name="LATVAR" order="true" type="N">Latitude variable:</Role>
<Role exclude="VAR" maxVars="1" minVars="1" name="LONGVAR" order="true" type="N">Longitude variable:</Role>
<Role maxVars="1" minVars="1" name="NAMEVAR" order="true" type="C">Name/Label variable:</Role>
              </Roles>
</DataSource>
</DataSources>
<Options>
<Option inputType="string" name="DATATAB">DATA</Option>
<Option inputType="string" name="DATAGROUP">DATA</Option>
<Option inputType="string" name="labelDATA">Choose an input dataset that has latitude, longitude, and label(City, Place, etc).</Option>

<Option inputType="string" name="ROLESGROUP">ROLES</Option>

<Option inputType="string" name="OPTIONSTAB">OPTIONS</Option>

<Option inputType="string" name="GROUPCOMBO">STATE</Option>
<Option inputType="string" name="labelCOMBO">Choose a state to map.</Option>
<Option defaultValue="NC" inputType="combobox" name="stateCODE">State:</Option>
       <Option inputType="string" name="AL">Alabama</Option>
       <Option inputType="string" name="AK">Alaska</Option>
       <Option inputType="string" name="AZ">Arizona</Option>
       <Option inputType="string" name="AR">Arkansas</Option>
                                  .
                                  .
                                  .
<Option inputType="string" name="VA">Virginia</Option>
       <Option inputType="string" name="WA">Washington</Option>
       <Option inputType="string" name="WV">West Virginia</Option>
       <Option inputType="string" name="WI">Wisconsin</Option>
       <Option inputType="string" name="WY">Wyoming</Option>

       <Option inputType="string" name="GROUPTEXT">MAP TITLE</Option>
       <Option inputType="string" name="labelTEXT1">Enter a title for your map.</Option>
<Option defaultValue="" indent="1" inputType="inputtext" missingMessage="Missing text." name="textTITLE1" promptMessage="Enter a title." required="false">Title 1:</Option>
<Option inputType="string" name="labelTEXT2">Enter a secondary title for your map.</Option>
<Option defaultValue="" indent="1" inputType="inputtext" missingMessage="Missing text." name="textTITLE2" promptMessage="Enter a secondary title." required="false">Title 2:</Option>

</Options>
Step 4: Creating the UI Portion of the State Map Task
Remember, each object in the metadata portion will have corresponding code in the UI portion. The UI portion determines the ordering of the display of the task. Just like before, find the code that correspond with the objects we need (one combobox, one dataset selector, three role selectors, two input text boxes) in the UI section of the Sample Task, and copy and paste them into the same place in your task. Edit to code you copied to correspond with what we want as our finished product.
This is what your finished UI portion should look like:
<Container option="DATATAB">
       <Group open="true" option="GROUPCOMBO">
              <OptionItem option="labelCOMBO"/>
              <OptionChoice option="stateCODE">
                     <OptionItem option="AL"/>
                     <OptionItem option="AK"/>
                     <OptionItem option="AZ"/>
                     <OptionItem option="AR"/>
                                  .
                                  .
                                  .
                     <OptionItem option="VA"/>
                     <OptionItem option="WA"/>
                     <OptionItem option="WV"/>
                     <OptionItem option="WI"/>
                     <OptionItem option="WY"/>
              </OptionChoice>
       </Group>
       <Group open="true" option="DATAGROUP">
              <OptionItem option="labelDATA"/>
              <DataItem data="DATASOURCE"/>
       </Group>
       <Group open="true" option="ROLESGROUP">
              <RoleItem role="LATVAR"/>
              <RoleItem role="LONGVAR"/>
              <RoleItem role="NAMEVAR"/>
       </Group>
</Container>
<Container option="OPTIONSTAB">
       <Group open="true" option="GROUPTEXT">
              <OptionItem option="labelTEXT1"/>
              <OptionItem option="textTITLE1"/>
              <OptionItem option="labelTEXT2"/>
              <OptionItem option="textTITLE2"/>
       </Group>
</Container>
Step 5: Creating the Code Template Portion of the State Map Task
One of the reasons we are creating this task is because Proc GMAP can be a little confusing. Again, for the code portion of this task, I followed this example from support.sas.com. In your SAS code, you will reference the Velocity macro variables that we created above ($DATASOURCE, $LATVAR, $LONGVAR, $stateCODE, etc.).
This is what your final Code Template portion should look like:
/* Create a map data set for the selected state */
data points;
       set $DATASOURCE;
       #foreach ( $item in $LATVAR ) y = $item; #end
       #foreach ( $item in $LONGVAR ) x = $item; #end
       #foreach ( $item in $NAMEVAR ) name = $item; #end
       state = $stateCODE;
run;
/* Create an annotate data set to label the locations with the names */
data annotate;
   set points;
   length function style color $8 text $25;
   /* Set the coordinate system to actual data values. */
   retain xsys ysys '2' when 'a' size 1.5;
   function='label';
   color='black';
   text=name;
   position='2';
   style="Arial";
   output;
   style='special';
   text='M';
   position='5';
   output;
run;
/* Project the annotate data set to match the MAPSGFK.US_STATE map data set */
proc gproject data=annotate out=anno dupok
     parmin=mapsgfk.projparm parmentry=us_states;
   id state;
run;
data state;
   set mapsgfk.us_states;
   where statecode='$stateCODE';
run;
title1 "$textTITLE1";
title2 "$textTITLE2";
data sample;
   statecode = '$stateCODE';
   value=10;
run;
goptions border;
/* Generate a map of NC with city names */
proc gmap data=sample map=state;
   id statecode;
   choro statecode / discrete annotate=anno nolegend;
run;
quit;
Step 6: Run the State Map Task
You’re finished! You just created a custom user interface to create a state map containing points specified from a user’s dataset. Click the 


Want to try it yourself?
Get the code from the zip file at the end of this article or from GitHub.
- Mark as Read
- Mark as New
- Bookmark
- Permalink
- Report Inappropriate Content
It's not Tuesday! 🙂
- Mark as Read
- Mark as New
- Bookmark
- Permalink
- Report Inappropriate Content
@Reeza It was when I posted this! 🙂
- Mark as Read
- Mark as New
- Bookmark
- Permalink
- Report Inappropriate Content
| I am constantly thought about this, thankyou for putting up. |
- Mark as Read
- Mark as New
- Bookmark
- Permalink
- Report Inappropriate Content
@neiljakson Of course, thank you for reading!
April 27 – 30 | Gaylord Texan | Grapevine, Texas
Registration is open
Walk in ready to learn. Walk out ready to deliver. This is the data and AI conference you can't afford to miss.
Register now and save with the early bird rate—just $795!
SAS AI and Machine Learning Courses
The rapid growth of AI technologies is driving an AI skills gap and demand for AI talent. Ready to grow your AI literacy? SAS offers free ways to get started for beginners, business leaders, and analytics professionals of all skill levels. Your future self will thank you.
- Find more articles tagged with:
- Custom Task Tuesday


