- Home
- /
- SAS Communities Library
- /
- Automate SAS 9 Code Unit Tests in a DevOps Pipeline with Jenkins and S...
- RSS Feed
- Mark as New
- Mark as Read
- Bookmark
- Subscribe
- Printer Friendly Page
- Report Inappropriate Content
Automate SAS 9 Code Unit Tests in a DevOps Pipeline with Jenkins and SASUnit Part 3
- Article History
- RSS Feed
- Mark as New
- Mark as Read
- Bookmark
- Subscribe
- Printer Friendly Page
- Report Inappropriate Content
To be truly CI/CD, you need to design and perform automated tests. Test automation reduces dramatically the time to release a feature by detecting errors early. Learn how to configure Jenkins to trigger automated tests with SASUnit, a unit testing framework for SAS 9 code.
The test automation topic can be broad. Let us break it down into several parts:
- Visualize tests results
- Setup SASUnit, a SAS 9 Testing Framework
- Setup Jenkins to work with SASUnit ⭢ this post
- Add a new unit (SAS code) and test in SAS Unit
- Towards Continuous Testing
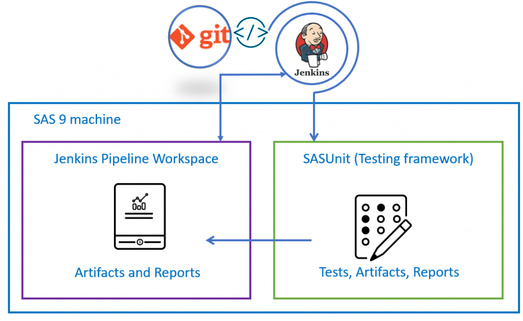
For the whole process, you need the following technical components used: SAS 9, SAS 9 machine (Windows), Jenkins, Jenkins agent, SASUnit, Jenkins plugins: SASUnit, Blue Ocean, GitLab.
The focus is on Jenkins.
Select any image to see a larger version.
Mobile users: To view the images, select the "Full" version at the bottom of the page.
Jenkins Setup
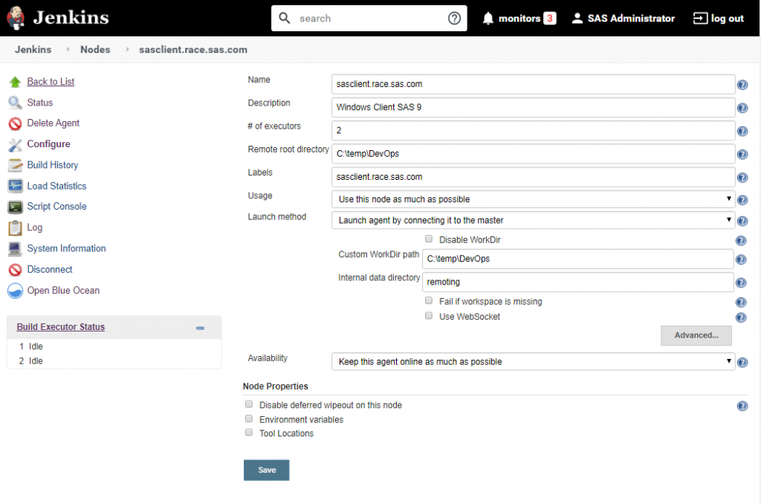
Jenkins agent on the SAS 9 machine
To Run SASUnit you have to define a Jenkins agent on the machine on which SAS 9 is installed (and where SASUnit is running the tests). We discussed the role of the agent in previous posts.
Obviously, Jenkins can run agents on Linux machines. And SASUnit can be configured on Linux machines where SAS 9 is installed.
Go to Build Executor Status (Jenkins Nodes):
The Jenkins agent must be connected and running.
Install the SASUnit Jenkins plug-in
Go to Jenkins Plugin Manager > Available. Search for SASUNIT, select and install without restart. After the successful installation you should see:
Configure the SASUnit Jenkins plug-in
You can view the Jenkins SASUnit plug-in documentation. However, allow me to guide you through and save you the time you would search blindly.
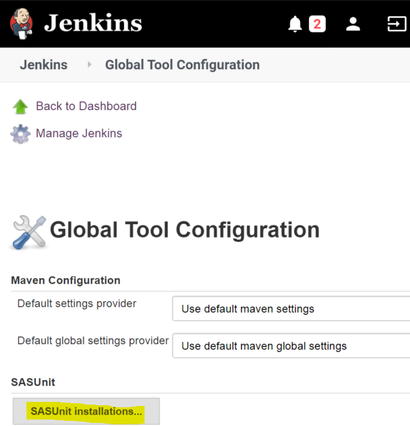
Go to Manage Jenkins > Global Tool Configuration. Under SASUnit, find SASUnit > SASUnit installations.
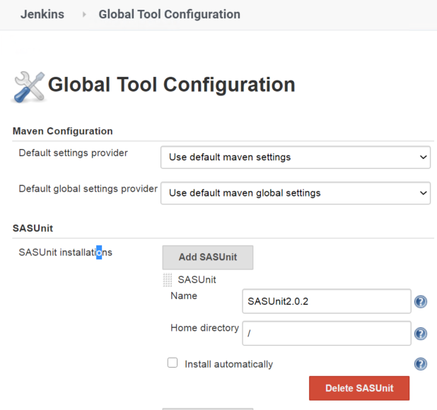
Add SASUnit:
- The name: SASUnit 2.0.2, like the version.
- Point the Home Directory to / (this is the SASUNIT_ROOT variable you defined in the previous post).
As a side note, you can configure an automatic installation of SASUnit, which I think is a great feature! With an automatic installer you can script the installation steps, so that if you change the agent, SASUnit will be automatically installed before running.
Configure the location of SASUnit on the Jenkins agent
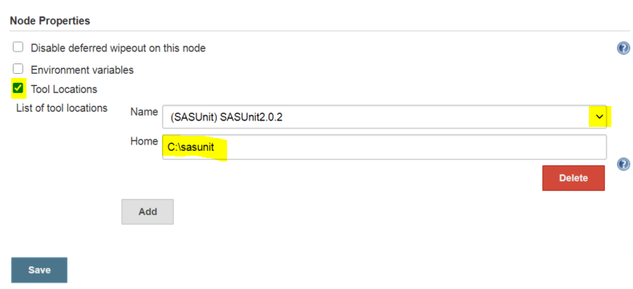
We need to tell Jenkins where SASUnit is installed on the agent, the SAS 9 machine. Go to Jenkins Nodes. Find your SAS 9 agent. Check Tool Locations (at the bottom).
Choose SASUnit and point it to the SASUNIT_ROOT path on the SAS 9 Windows machine: C:\sasunit. This is the same location you had to alter in the previous post at Configure SASUnit batch files.
Jenkins unit testing pipeline
Define the pipeline
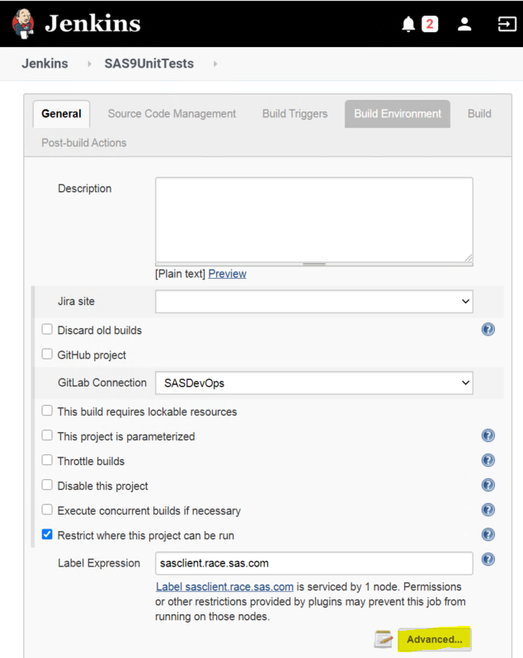
Create a new pipeline. Restrict the run to the defined SAS 9 agent, where SASUnit is installed.
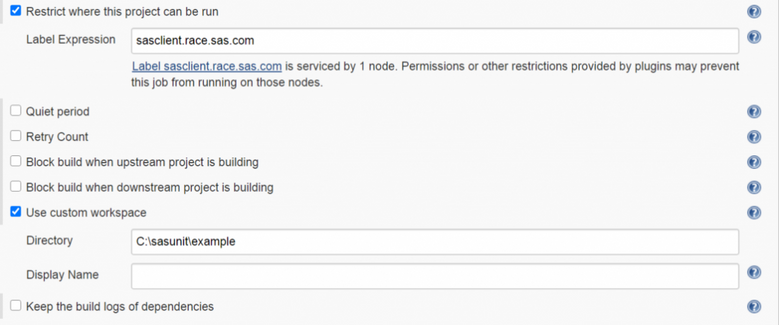
Click Advanced under the agent label. Jenkins needs a workspace for the artifacts to run.
Fill in the location of the SASUnit batch commands, found in the \bin folder, C:\sasunit\example\bin . Because we want the artifacts from C:\sasunit\example\ folders, point the location one level up to C:\sasunit\example .
Execute SASUnit in a pipeline
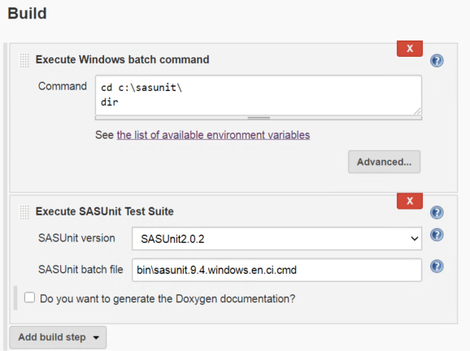
Add a first step to navigate to the SASUNIT_ROOT folder C:\sasunit.
Add a second step ‘Execute SASUnit Test Suite’ to execute SASUnit via the batch file.
The step can be found in Jenkins because you installed the SASUnit plugin. The executable corresponds to the C:\sasunit\example\bin\sasunit9.4.windows.en.ci.cmd.
Choose the sasunit9.4.windows.en.ci.cmd , ci stands for ‘continuous integration’ and is meant to be used with Jenkins.
The difference between sasunit9.4.windows.en.ci.cmd and sasunit.9.4.windows.en.overwrite.ci.cmd ? En.ci.cmd will only look at what changes in the testing unit folders, while overwrite.en.ci.cmd will redo all the tests from scratch.
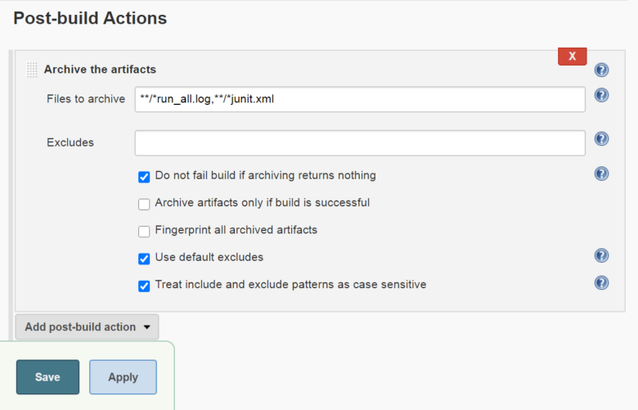
Add a post build action to archive the artifacts
At execution time, artifacts such as .log or junit.xml files will be generated.
JUnit is one of those unit frameworks which were initially used by many Java applications as a Unit test framework. By default, JUnit tests generate simple report XML files for its test execution. These XML files can then be used to generate any custom reports as per the testing requirement.
The file path is relative to the custom workspace C:\sasunit\example defined in the pipeline definition.
The artifacts are stored in the Jenkins Pipeline Workspace, at build time.
How to display build and test results in Jenkins
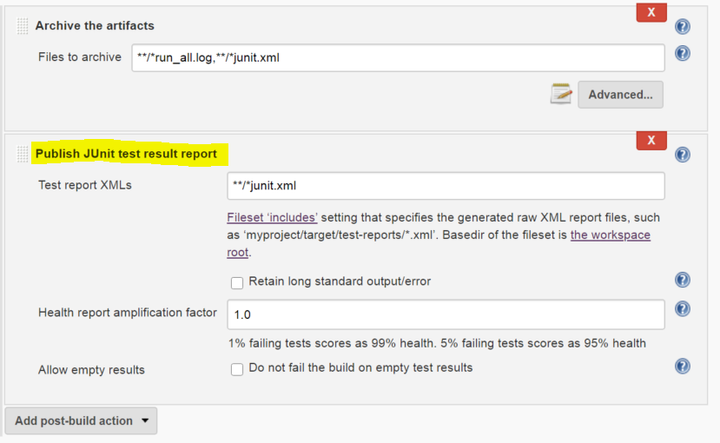
By using the Jenkins post-build step "Publish JUnit test result report" you can display the result of your SASUnit build. The only thing left to do is telling Jenkins where to search for this file. **/*junit.xml will search all folders of the custom workspace folder C:\sasunit\example for a file called junit.xml:
The health report amplification factor defines a threshold for a stable or unstable build.
SASUnit generates the junit.xml file
The file contains the number of passed tests (asserts) and you can get an overview of the test outcome.
The build status will automatically be determined by the created JUnit-XML. If there are no failed asserts the build is stable. If there are failed asserts the build is unstable.
SASUnit will create a JUnit-XML file if you specify o_junit=1 in the macro call of reportSASUnit:
%reportsasunit(
i_language =%upcase(%sysget(SASUNIT_LANGUAGE))
,o_html     =1
,o_junit    =1
);
The JUnit.xml file and the HTML documentation are created in the C:\sasunit\example\docsasunit\en\rep folder .
How to display SASUnit HTML reports in Jenkins
Displaying SASUnit documentation in Jenkins is easy. You can use the post build step "Publish HTML Reports":
Test Results
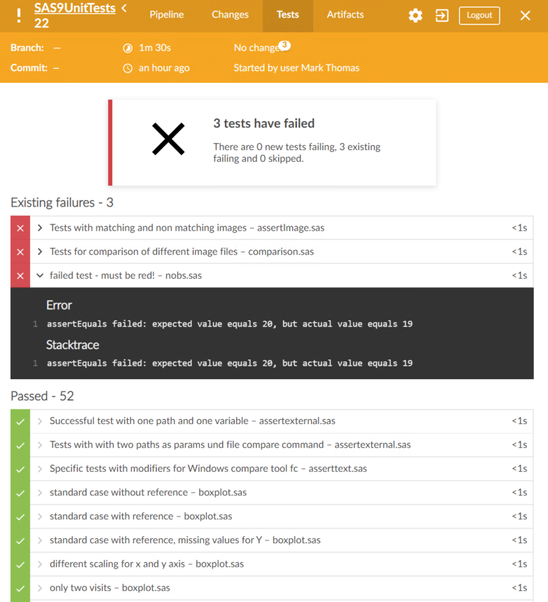
Finally, when we run the pipeline we get the results, presented in the previous post, Visualize tests results.
Conclusions
We looked at how to set test automation in Jenkins and the configuration needed to call SASUnit, a testing framework and to display the test results.
Next
Navigate through the post series:
- Visualize tests results
- Setup SASUnit, a SAS 9 Testing Framework
- Setup Jenkins to work with SASUnit ⭢ this post
- Add a new unit (SAS code) and test in SAS Unit ⭢ next post
- Towards Continuous Testing
Recommended Resources
- DevOps Applied to SAS 9: SAS DI jobs, the Git Plug-in, GitLab and Jenkins
- DevOps Applied to SAS 9: SAS Code, GitLab and Jenkins
- SASUnit documentation.
- Getting started with SASUnit page.
- SASUnit Jenkins plug-in.
- SASUnit System Requirements.
Thank you for your time reading this post. Please comment and share your experience with SASUnit, unit testing or SAS 9 and DevOps.
SAS AI and Machine Learning Courses
The rapid growth of AI technologies is driving an AI skills gap and demand for AI talent. Ready to grow your AI literacy? SAS offers free ways to get started for beginners, business leaders, and analytics professionals of all skill levels. Your future self will thank you.
