- Home
- /
- Programming
- /
- ODS Reports
- /
- The DATA step ODSOUT object
- RSS Feed
- Mark Topic as New
- Mark Topic as Read
- Float this Topic for Current User
- Bookmark
- Subscribe
- Mute
- Printer Friendly Page

- Mark as New
- Bookmark
- Subscribe
- Mute
- RSS Feed
- Permalink
- Report Inappropriate Content
I needed to create a report which would consist of PROC PRINT-like output per BY group, but with a couple of lines preceding each block to include information that was common for the whole BY group.
The result should be a well structured PDF document.
Most of you will be familiar with creating a custom-style report using FILE PRINT and PUT statements. With the pointer control in the PUT statement you have a high degree of flexibility, but FILE PRINT and PUT are listing-oriented. Although you can send the output to an ODS destination it is still listing style.
One step up is to used FILE PRINT ODS and PUT _ODS_. It allows you to use as standard table lay-out or define one yourself using PROC TEMPLATE.
But...
Although you can off course use FIRST.BY_variable and LAST.BY_variable in your DATA step programming, it does not result in a separation of output blocks per BY group in your output. The whole table that you build with FILE PRINT ODS and the PUT _ODS_ statements will be one long stream. The header lines that I wanted to include for each BY group were only included once at the start of the first BY-group.
While looking for a solution I came across a paper by Daniel O'Connnor of SAS Institute Inc.: “The Power to Show: Ad Hoc Reporting, Custom Invoices, and Form Letters” (paper 313-2009), describing the ODSOUT object.. ODSOUT is “experimental” in SAS 9.1.3 and “pre-production” in SAS 9.3.
The ODSOUT object is a DATA step object, just as the HASH and HITER objects. So you have to learn how to deal with them. It's not difficult, but slightly different from ordinary DATA step programming.
First of all you have to declare and create the object, only once:
if _n_ = 1 then do;
declare odsout RMS();
end;
This creates the ODSOUT object called RMS. That RMS will be present in all commands that are directed to the object. Once it is created you can send output to it, according to a lay-out you define. In my case the lay-out is a PROC PRINT-like table with 8 columns and 5 data rows and a couple of lines preceding that table. That is the pattern I want to repeat for each BY-group.
To create a table you use the TABLE_START method when starting a new BY group:
if first.flight_date then do;
rms.table_start(name: flight_num||'_'||put(flight_date,date.),
label: flight_num||'_'||put(flight_date,date.),
overrides: "width=6in");
The name and label parameters give a name and description to the output object that is created and will show up in a table of contents. The overrides parameter overrides some aspect of the standard table definition, in our case it sets the total table width at 6 inch.
The first thing in the table is the header. You start the header section with
rms.head_start();
A header consists of rows, so the next command is:
rms.row_start();
Each row consists of cells as any decent spreadsheet-like two-dimensional table has. To get information into a cell you have to format the cell. The header will span all 8 detail lines that form the body of the report:
rms.format_cell(data: "Flight number: "||flight_num||' '||"Departure date: "||
put(flight_date,date.)||' ('||put(dow,days.)||')',
column_span: 8,
overrides: "backgroundcolor=cx484848 color=white");
This creates a dark-gray header line which spans the 8 columns and contains information in a white font. The information is just the text that is created in the data: parameter.
With that the over-all header line of a BY group block is completed. So we can end the row and the header section:
rms.row_end();
rms.head_end();
Now follows the part with the parameters that are common for all detail lines that follow. For each parameter we need two cells: one for the name of the parameter and one for its value. There is enough room to put two parameters side by side:
rms.row_start();
rms.format_cell(data: "Days before dept:",
column_span: 2,
overrides: "backgroundcolor=cxe0e0e0 font_weight=bold");
rms.format_cell(data: put(snapshot,x_dbd.),
column_span: 2 );
rms.format_cell(data: "Aircraft:",
column_span: 2,
overrides: "backgroundcolor=cxe0e0e0 font_weight=bold");
rms.format_cell(data: AC||' (Capacity: '||trim(left(put(capacity,4.)))||')',
column_span: 2 );
rms.row_end();
This time the column_span is 2 for all cells, nicely adding up to 8 again. The first and third cell contain the name of the parameter. They will have a light-gray background and bold characters. This principle is repeated for all parameters. Only the last one (see the result picture) is slightly different: it is spanning 4 columns.
After the parameters it is time to create the header for the detail part of the table:
rms.row_start();
rms.format_cell(data: "Class",
overrides: "backgroundcolor=cx606060 color=white font_weight=bold");
rms.format_cell(data: "Fare",
overrides: "backgroundcolor=cx606060 color=white font_weight=bold");
rms.format_cell(data: "Old AU",
overrides: "backgroundcolor=cx606060 color=white font_weight=bold");
rms.format_cell(data: "New AU",
overrides: "backgroundcolor=cx606060 color=white font_weight=bold");
rms.format_cell(data: "Old SA",
overrides: "backgroundcolor=cx606060 color=white font_weight=bold");
rms.format_cell(data: "New SA",
overrides: "backgroundcolor=cx606060 color=white font_weight=bold");
rms.format_cell(data: "Mu",
overrides: "backgroundcolor=cx606060 color=white font_weight=bold");
rms.format_cell(data: "STD",
overrides: "backgroundcolor=cx606060 color=white font_weight=bold");
rms.row_end();
All this is done only at the start of the BY group. So now we have to close the IF statement with which we started.
end;
Now it is time to fill the detail cells of the table. Note the construction with thet PUT function to format the last two cells. The data parameters does not allow to specify a format like in a PUT statement, neither are formats attached to the variable honored. But this way we provide a formatted string to the routine.
rms.row_start();
rms.format_cell(data: Class);
rms.format_cell(data: Fare);
rms.format_cell(data: Old_AU);
rms.format_cell(data: New_AU);
rms.format_cell(data: Old_SA);
rms.format_cell(data: New_SA);
rms.format_cell(data: put(Mu,4.1));
rms.format_cell(data: put(STD,4.1));
rms.row_end();
After writing out the detail lines of the BY group we have to close the table:
if last.flight_date then do;
rms.table_end();
Some extra space between to blocks would help and then we are ready.:
rms.format_text(data: " ");
end;
And this is the result (for confidentiality reasons some fields are grayed out)
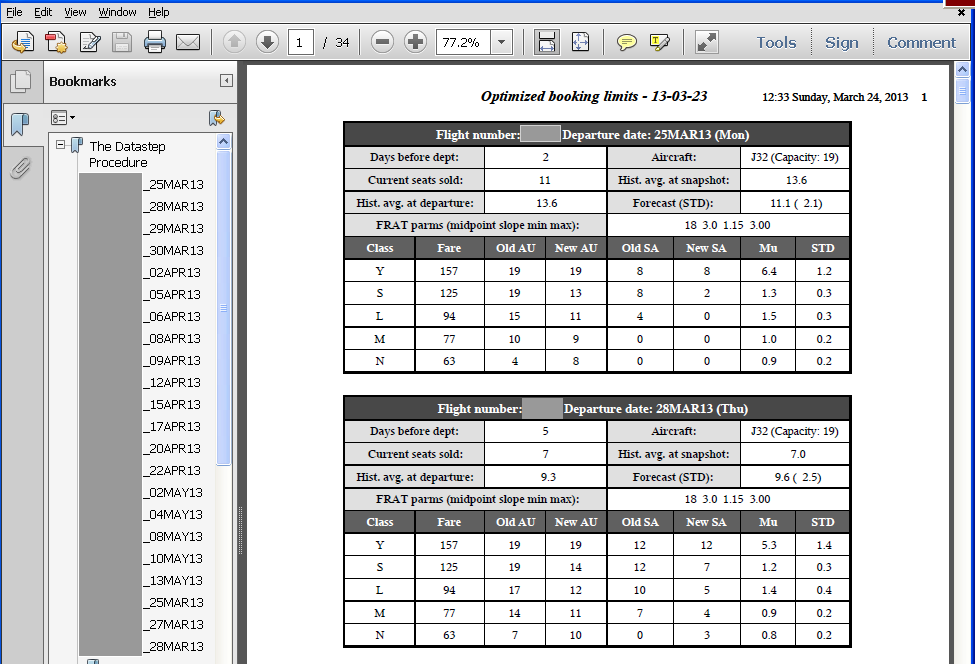
Is it perfect? Almost. It worked fine and I got what I wanted. During the creation of the report I noticed that under circumstances a block was split over two pages. I did not try to figure out what the criteria were, but a command to prevent a table from being split would be great.
This story only touches the surface of what you can do with the OSDOUT object. I recommend that you read Daniel's paper. It contains many more examples of what you can do with it. It can be found here: support.sas.com/resources/papers/sgf09/313-2009.pdf ODS

- Mark as New
- Bookmark
- Subscribe
- Mute
- RSS Feed
- Permalink
- Report Inappropriate Content
Broken link to Daniel's paper. This works today: https://support.sas.com/rnd/base/datastep/dsobject/Power_to_show_paper.pdf
.jpg")
Catch up on SAS Innovate 2026
Nearly 200 sessions are now available on demand in the Innovate Hub.
Watch Now →Learn how use the CAT functions in SAS to join values from multiple variables into a single value.

Find more tutorials on the SAS Users YouTube channel.
SAS Training: Just a Click Away
Ready to level-up your skills? Choose your own adventure.
-
1 reply
-
03-25-2013 01:03 PM
-
3137 views
-
3 likes
-
2 in conversation
-
