- Home
- /
- SAS Communities Library
- /
- SAS Viya OKTA SCIM
- RSS Feed
- Mark as New
- Mark as Read
- Bookmark
- Subscribe
- Printer Friendly Page
- Report Inappropriate Content
SAS Viya OKTA SCIM
- Article History
- RSS Feed
- Mark as New
- Mark as Read
- Bookmark
- Subscribe
- Printer Friendly Page
- Report Inappropriate Content
In this article we will continue looking at the System for Cross-domain Identity Management (SCIM) and SAS Viya. In my previous article, SAS Viya SCIM Configuration, we examined the configuration of the SAS Viya environment and in SCIM and SAS Viya, we looked at the requirements and considerations for using SCIM. We have also reviewed the setup with Azure AD; this time we will examine the configuration that needs to be completed within OKTA. View details of how provisioning works with OKTA.
Note: These instructions are correct at the time of writing: January 2021. However, since they use the OKTA Portal the screens and options might change.
OKTA Configuration
The configuration of OKTA requires administrator level access within the OKTA tenant. Log into the OKTA tenant you will be using and select Admin. Select Applications from the top menu.
 |
Mobile users: To view the images, select the "Full" version at the bottom of the page.
Select the green button: Add Application. Enter "SCIM" in the search field and select See All Results.
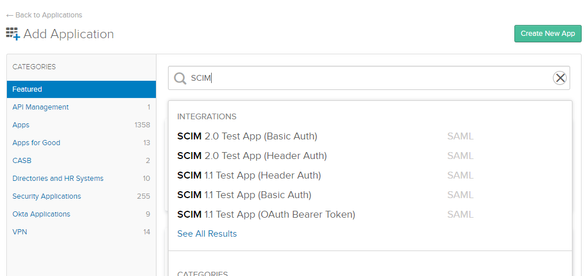 |
Select SCIM 2.0 Test App (OAuth Bearer Token) in the results, as shown here:
This will open the summary screen for the application:
 |
Select the green button: Add.
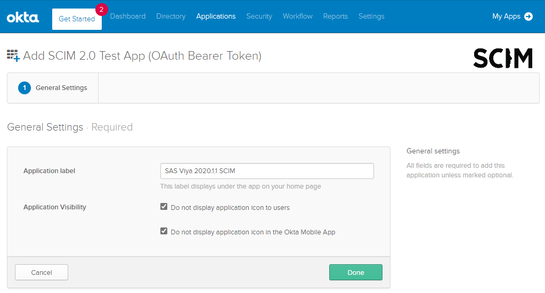
Update the Application label to a name for your SAS Viya environment, for example SAS Viya 2020.1.1 SCIM. You will need to configure a separate application within OKTA to configure either SAML or OpenID Connect, this application will only deal with the SCIM provisioning. As such you can select the two options for Application Visibility. Select Done.
 |
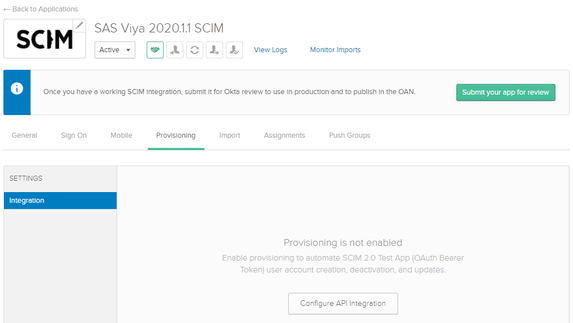
Select the Provisioning tab and select Configure API Integration:
 |
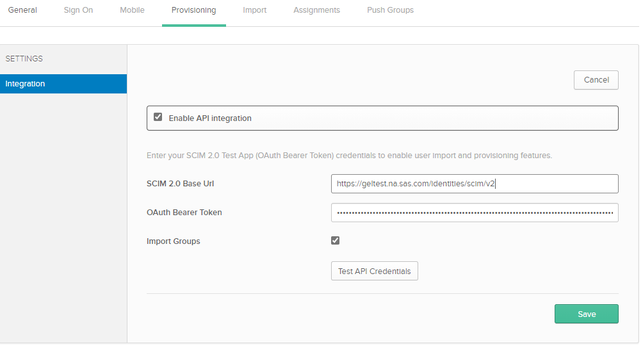
Select Enable API Integration. For the SCIM 2.0 Base Url enter the enter the full URL to the SAS Viya deployment plus /identities/scim/v2. For example: https://viya.customer.com/identities/scim/v2. Add the bearer token, generated in SAS Viya as described in SAS Viya SCIM Configuration as the OAuth Bearer Token. Leave the option Import Groups selected.
 |
Select Test API Credentials. You should see the message:
If this is not successful, then either the setup you completed in SAS Viya SCIM Configuration is incorrect. Or there are firewalls preventing OKTA from connecting to the SAS Viya environment.
Select Save. The contents of the Provisioning tab will now update, and you will be on the To App settings. Select Edit.
 |
Check the Enable boxes next to Create Users, Update User Attributes, and Deactivate Users. SAS Viya does not store user passwords so leave Sync Password disabled. You will need to setup single sign-on using SAML or OpenID Connect (OIDC) so users may sign in. Select Save.
Select the Sign On tab and select Edit.
 |
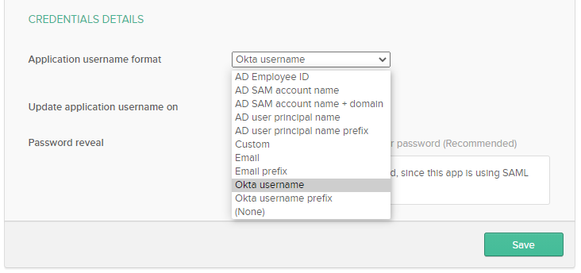
Scroll down to the Credentials Details. Here you can choose what value OKTA will send to SAS Viya for the username field. Important: this needs to match the single sign-on configuration. By default, it will use the OKTA username. Make sure Create and update is selected but note that SAS Viya does not handle changes to the username well since existing folders, files, etc. will not be migrated under the new username. Select Save.
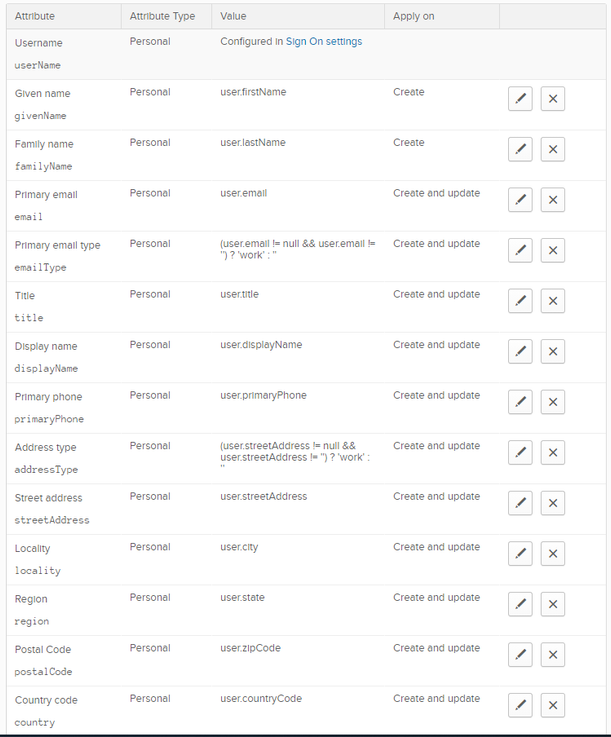
Select the Provisioning tab and scroll down to the Attribute Mappings. Notice it says the Username is configured in the Sign On settings. Modify the Attribute Mappings so they match what is shown below in the table:
| Attribute | Attribute Type | Value | Apply on |
|---|---|---|---|
| Username userName |
Personal | Configured in Sign On settings | |
| Given name givenName |
Personal | user.firstName | Create |
| Family name familyName |
Personal | user.lastName | Create |
| Primary email | Personal | user.email | Create and update |
| Primary email type emailType |
Personal | (user.email != null && user.email != '') ? 'work' : '' | Create and update |
| Title title |
Personal | user.title | Create and update |
| Display name displayName |
Personal | user.displayName | Create and update |
| Primary phone primaryPhone |
Personal | user.primaryPhone | Create and update |
| Address type addressType |
Personal | (user.streetAddress != null && user.streetAddress != '') ? 'work' : '' | Create and update |
| Street address streetAddress |
Personal | user.streetAddress | Create and update |
| Locality locality |
Personal | user.city | Create and update |
| Region region |
Personal | user.state | Create and update |
| Postal Code postalCode |
Personal | user.zipCode | Create and update |
| Country code country |
Personal | user.countryCode | Create and update |
Remove unlisted attributes, you should end up with the following:
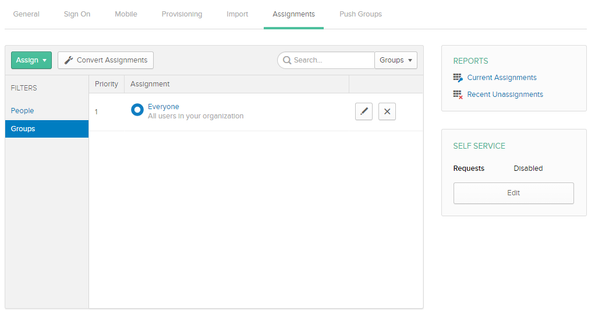
Select the Assignments tab. On the Assignments tab you may now Assign users to this application, either by choosing People under FILTERS or selecting Groups. OKTA will send them to SAS Viya as you assign them, and you should then be able to see them appear in SAS Environment Manager.
 |
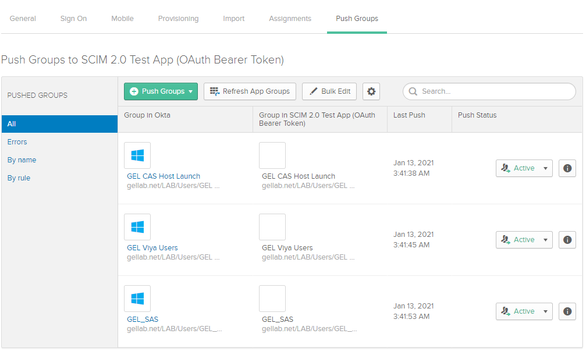
Select the Push Groups tab to select the groups that should be sent to SAS Viya. Click on the green Push Groups button and choose either option to find groups. You can select Save & Add Another to add multiple groups. When you have selected all the groups that you want, select Save. OKTA will immediately send them to SAS Viya and you can view them in SAS Environment Manager.
 |
This completes the setup of SCIM in OKTA.
Troubleshooting
The users and groups will be provisioned as soon as they are assigned. You can review the logging information within OKTA. Within the SCIM application you have defined select the View Logs link displayed at the top.
 |
This will provide details of the provisioning actions. For example:
 |
You can specify a time period to review the logging messages and download a CSV of the returned logging information.
To review logging from SAS Viya additional logging must be configured for the Identities microservice. This can either be completed in SAS Environment Manager or by using the SAS Viya CLI. To use the SAS Viya CLI create the required JSON file with the following contents:
tee  ~/identitiesSCIMLogging.json > /dev/null << EOF
{
  "name": "launcherLogging",
  "items": [
    {
      "version": 1,
      "metadata": {
        "isDefault": false,
        "services": ["identities"],
        "mediaType": "application/vnd.sas.configuration.config.logging.level+json;version=1"
      },
      "name": "request",
      "level": "DEBUG"
    }
  ]
}
EOF
This will set logging.level.request = DEBUG for the Identities microservice. This JSON file can be applied with the SAS Viya CLI. You will need to authenticate with an administrator, probably sasboot:
/opt/sas/viya/home/bin/sas-viya auth login;\
/opt/sas/viya/home/bin/sas-viya configuration configurations create \
--file ~/identitiesSCIMLogging.json ;\
/opt/sas/viya/home/bin/sas-viya auth logout
You should see something like the following:
Enter credentials for https://viya.customer.com:
Login succeeded. Token saved.
"POST" "/configuration/configurations" complete from "identitiesSCIMLogging.json".
Logout succeeded.
This will then output messages such as the following during SCIM operations to the Identities microservice log file:
DEBUG 2021-01-08 16:22:11.445 +0000 [sas-identities] - Before request [uri=/identities/scim/v2/Users?filter=userName+eq+%22ad6dd209-c3f2-4c15-8ad8-6580ce49d527%22]
DEBUG 2021-01-08 16:22:11.491 +0000 [sas-identities] - After request [uri=/identities/scim/v2/Users?filter=userName+eq+%22ad6dd209-c3f2-4c15-8ad8-6580ce49d527%22]
DEBUG 2021-01-08 16:22:11.491 +0000 [sas-identities] - status=200; payload={"schemas":["urn:ietf:params:scim:api:messages:2.0:ListResponse"],"startIndex":0,"itemsPerPage":0,"totalResults":0,"Resources":[]} [0:200 1:{"schemas":["urn:ietf:params:scim:api:messages:2.0:ListResponse"],"startIndex":0,"itemsPerPage":0,"totalResults":0,"Resources":[]}]
DEBUG 2021-01-08 16:22:12.331 +0000 [sas-identities] - Before request [uri=/identities/scim/v2/Users/gelviyaadmin@gellab.net]
DEBUG 2021-01-08 16:22:12.368 +0000 [sas-identities] - After request [uri=/identities/scim/v2/Users/gelviyaadmin@gellab.net]
DEBUG 2021-01-08 16:22:12.368 +0000 [sas-identities] - status=200; payload={"id":"gelviyaadmin@gellab.net","userName":"gelviyaadmin@gellab.net","active":true,"externalId":"gelviyaadmin","displayName":"Viya Admin, GEL","emails":[{"value":"gelviyaadmin@gellab.net","type":"work","primary":true}],"phoneNumbers":[{"value":"999","type":"work","primary":true}],"addresses":[],"groups":[{"value":"GEL_SAS","$ref":"https://viya.customer.com/identities/scim/v2/Groups/GEL_SAS","display":"GEL_SAS"}],"schemas":["urn:ietf:params:scim:schemas:core:2.0:User"],"meta":{"resourceType":"User","created":"2021-01-07T23:05:37.820Z","lastModified":"2021-01-07T23:05:37.820Z"}} [0:200 1:{"id":"gelviyaadmin@gellab.net","userName":"gelviyaadmin@gellab.net","active":true,"externalId":"gelviyaadmin","displayName":"Viya Admin, GEL","emails":[{"value":"gelviyaadmin@gellab.net","type":"work","primary":true}],"phoneNumbers":[{"value":"999","type":"work","primary":true}],"addresses":[],"groups":[{"value":"GEL_SAS","$ref":"https://viya.customer.com/identities/scim/v2/Groups/GEL_SAS","display":"GEL_SAS"}],"schemas":["urn:ietf:params:scim:schemas:core:2.0:User"],"meta":{"resourceType":"User","created":"2021-01-07T23:05:37.820Z","lastModified":"2021-01-07T23:05:37.820Z"}}]
Once any issue has been resolved the additional logging can be removed with the SAS Viya CLI:
/opt/sas/viya/home/bin/sas-viya auth login;\
my_id=`/opt/sas/viya/home/bin/sas-viya configuration configurations \
list |grep -A 5 logging.level|grep -B 2 request|awk -F\" '{print $4}'|head -1` ;\
/opt/sas/viya/home/bin/sas-viya configuration configurations delete --id ${my_id} ;\
/opt/sas/viya/home/bin/sas-viya auth logout
This searches for configuration of logging.level.results and deletes the corresponding ID. You should see something like the following:
Enter credentials for https://viya.customer.com:
Login succeeded. Token saved.
The deletion of configuration "571e26ab-cdff-446f-a446-db95fea9cff2" is complete.
Logout succeeded.
This will remove the additional logging.
Conclusion
In this post as a follow on from configuring the SAS Viya environment, we have demonstrated the steps to configure the SCIM client in OKTA. With these steps complete the user and group information will be pushed from OKTA into the Identities microservice. You will still need to configure authentication for SAS Logon Manager for these users to be able to access SAS Viya. You can use either SAML or OpenID Connect from OKTA to SAS Viya.
SAS AI and Machine Learning Courses
The rapid growth of AI technologies is driving an AI skills gap and demand for AI talent. Ready to grow your AI literacy? SAS offers free ways to get started for beginners, business leaders, and analytics professionals of all skill levels. Your future self will thank you.
- Find more articles tagged with:
- GEL
