- Home
- /
- SAS Communities Library
- /
- SAS Viya Azure AD SCIM
- RSS Feed
- Mark as New
- Mark as Read
- Bookmark
- Subscribe
- Printer Friendly Page
- Report Inappropriate Content
SAS Viya Azure AD SCIM
- Article History
- RSS Feed
- Mark as New
- Mark as Read
- Bookmark
- Subscribe
- Printer Friendly Page
- Report Inappropriate Content
In this article we will continue looking at the System for Cross-domain Identity Management (SCIM) and SAS Viya. In my previous article, SAS Viya SCIM Configuration, we examined the configuration of the SAS Viya environment; and in SCIM and SAS Viya, we looked at the requirements and considerations for using SCIM. This time we will examine the configuration that needs to be completed within Azure Active Directory. View details of how provisioning works with Azure Active Directory.
Note: These instructions are correct at the time of writing: January 2021. However, since they use the Azure Portal, the screens and options might change.
Azure SCIM Configuration
To be able to configure an enterprise application in Azure Active Directory you will require a minimum of Application Administrator. However, only an Azure Active Directory Administrator will be able to grant permissions on Azure Active Directory itself to read user/group information.
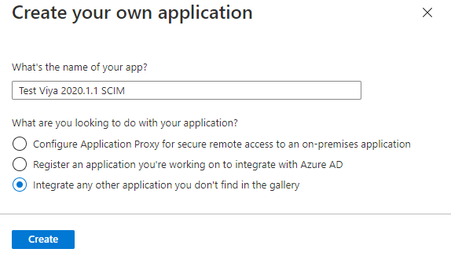
Sign-in to the Azure Portal and select Azure Active Directory. On the left pane, select Enterprise Applications, and select Create your own application. Enter a name for the application, select Integrate any other application you don't find in the gallery, and select Create.
 |
Mobile users: To view the images, select the "Full" version at the bottom of the page.
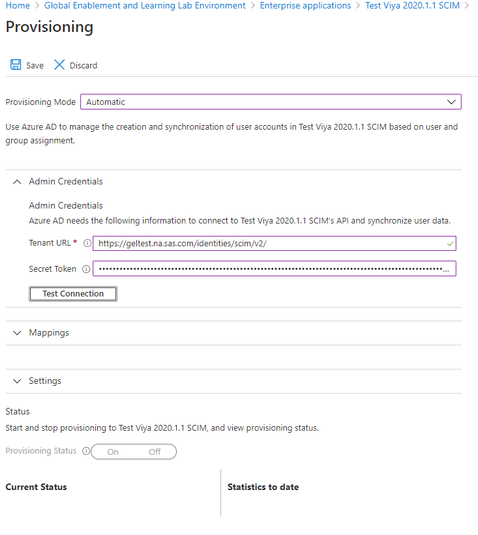
Select your new Enterprise Application and in the left pane select Provisioning. Set the Provisioning Mode to Automatic. Set the Tenant URL to the publicly available SAS Viya address with /identities/scim/v2/ appended. Add the bearer token, generated in SAS Viya as described in SAS Viya SCIM Configuration as the Secret Token.
 |
Select Test Connection – you should see the following popup message:
If this is not successful, then either the setup you completed in SAS Viya is incorrect. Or there are firewalls preventing Azure Active Directory from connecting to the SAS Viya environment.
Now scroll down and expand the Mappings section. Select Provision Azure Active Directory Groups. Ensure Enabled is set to Yes. In the list of attributes, we only want displayName and members, remove the externalId attribute.
 |
Select Save at the top.
Again, under Mappings section select Provision Azure Active Directory Users. Ensure Enabled is set to Yes. Delete the following list of mappings not used by SAS Viya:
- preferredLanguage
- givenName
- surname
- Join(" ", [givenName], [surname])
- physicalDeliveryOfficeName
- employeeId
- department
- manager
The remaining mappings should match what is shown on the screenshot below.
 |
The mapping for userName is important. Azure Active Directory defaults this field to userPrincipalName. This must match what you use for username with SAML or OpenID Connect. The default will work with SAML since the Azure AD configuration defaults the Unique User Identifier to user.userprincipalname. However, if you are using OpenID Connect with email address, you will need to change the userName mapping to mail (as shown in the screenshot). Select Save at the top.
Back on the Provisioning page expand Settings. Here you can specify an email address which will be notified if there is a failure. Also, you can specify the Scope.
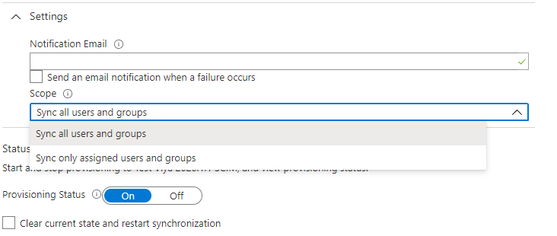 |
For the Scope you can either synchronize all users and groups or only the users and groups assigned to the Enterprise Application. To be able to assign groups to the Enterprise Application you will need to have Azure AD Premium P2 subscription. Otherwise, you can set the Scope to Sync all user and groups and then limit the objects that will be synchronized on the Mappings sections for groups and users. For both mapping sections there is a Source Object Scope that allows a range of different selection criteria.
Finally, on the Provisioning page at the bottom is the option to enabling provisioning:
 |
Set Provisioning Status to On and select Save.
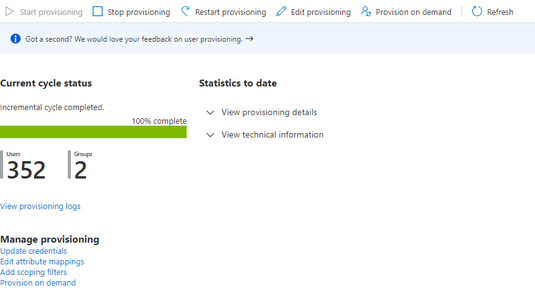
It will take several minutes before Azure Active Directory will start syncing users and groups. Once it does, you can see the status of how many users and groups it has synchronized and view audit logs from this Provisioning screen.
 |
Troubleshooting
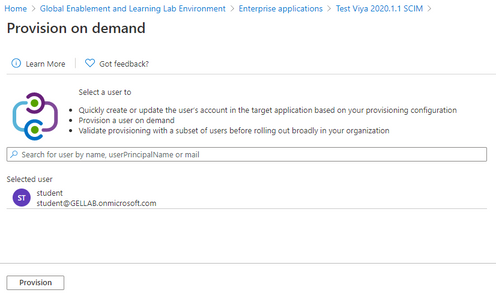
To test provisioning is going to work as expected, rather than wait for the full provisioning cycle to run, an individual user can be provisioned on demand. Select Enterprise Applications, your application name, and then Provisioning. On this Provisioning page select the option Provision on demand at the top.
Search for the user by name, userPrincipalName or email addresses. Once the user is selected, select Provision.
 |
This will then provide details of the provisioning steps:
- Import user
- Determine if user is in scope
- Match user between source and target system
- Perform action
Details of each step can be reviewed in the Azure Portal.
To review logging from SAS Viya additional logging must be configured for the Identities microservice. This can either be completed in SAS Environment Manager or by using the SAS Viya CLI. To use the SAS Viya CLI create the required JSON file with the following contents:
tee  ~/identitiesSCIMLogging.json > /dev/null << EOF
{
  "name": "launcherLogging",
  "items": [
    {
      "version": 1,
      "metadata": {
        "isDefault": false,
        "services": ["identities"],
        "mediaType": "application/vnd.sas.configuration.config.logging.level+json;version=1"
      },
      "name": "request",
      "level": "DEBUG"
    }
  ]
}
EOF
This will set logging.level.request = DEBUG for the Identities microservice. This JSON file can be applied with the SAS Viya CLI. You will need to authenticate with an administrator, probably sasboot:
/opt/sas/viya/home/bin/sas-viya auth login;\
/opt/sas/viya/home/bin/sas-viya configuration configurations create \
--file ~/identitiesSCIMLogging.json ;\
/opt/sas/viya/home/bin/sas-viya auth logout
You should see something like the following:
Enter credentials for https://viya.customer.com:
Login succeeded. Token saved.
"POST" "/configuration/configurations" complete from "identitiesSCIMLogging.json".
Logout succeeded.
This will then output messages such as the following during SCIM operations to the Identities microservice log file:
DEBUG 2021-01-08 16:22:11.445 +0000 [sas-identities] - Before request [uri=/identities/scim/v2/Users?filter=userName+eq+%22ad6dd209-c3f2-4c15-8ad8-6580ce49d527%22]
DEBUG 2021-01-08 16:22:11.491 +0000 [sas-identities] - After request [uri=/identities/scim/v2/Users?filter=userName+eq+%22ad6dd209-c3f2-4c15-8ad8-6580ce49d527%22]
DEBUG 2021-01-08 16:22:11.491 +0000 [sas-identities] - status=200; payload={"schemas":["urn:ietf:params:scim:api:messages:2.0:ListResponse"],"startIndex":0,"itemsPerPage":0,"totalResults":0,"Resources":[]} [0:200 1:{"schemas":["urn:ietf:params:scim:api:messages:2.0:ListResponse"],"startIndex":0,"itemsPerPage":0,"totalResults":0,"Resources":[]}]
DEBUG 2021-01-08 16:22:12.331 +0000 [sas-identities] - Before request [uri=/identities/scim/v2/Users/gelviyaadmin@gellab.net]
DEBUG 2021-01-08 16:22:12.368 +0000 [sas-identities] - After request [uri=/identities/scim/v2/Users/gelviyaadmin@gellab.net]
DEBUG 2021-01-08 16:22:12.368 +0000 [sas-identities] - status=200; payload={"id":"gelviyaadmin@gellab.net","userName":"gelviyaadmin@gellab.net","active":true,"externalId":"gelviyaadmin","displayName":"Viya Admin, GEL","emails":[{"value":"gelviyaadmin@gellab.net","type":"work","primary":true}],"phoneNumbers":[{"value":"999","type":"work","primary":true}],"addresses":[],"groups":[{"value":"GEL_SAS","$ref":"https://viya.customer.com/identities/scim/v2/Groups/GEL_SAS","display":"GEL_SAS"}],"schemas":["urn:ietf:params:scim:schemas:core:2.0:User"],"meta":{"resourceType":"User","created":"2021-01-07T23:05:37.820Z","lastModified":"2021-01-07T23:05:37.820Z"}} [0:200 1:{"id":"gelviyaadmin@gellab.net","userName":"gelviyaadmin@gellab.net","active":true,"externalId":"gelviyaadmin","displayName":"Viya Admin, GEL","emails":[{"value":"gelviyaadmin@gellab.net","type":"work","primary":true}],"phoneNumbers":[{"value":"999","type":"work","primary":true}],"addresses":[],"groups":[{"value":"GEL_SAS","$ref":"https://viya.customer.com/identities/scim/v2/Groups/GEL_SAS","display":"GEL_SAS"}],"schemas":["urn:ietf:params:scim:schemas:core:2.0:User"],"meta":{"resourceType":"User","created":"2021-01-07T23:05:37.820Z","lastModified":"2021-01-07T23:05:37.820Z"}}]
Once any issue has been resolved the additional logging can be removed with the SAS Viya CLI:
/opt/sas/viya/home/bin/sas-viya auth login;\
my_id=`/opt/sas/viya/home/bin/sas-viya configuration configurations \
list |grep -A 5 logging.level|grep -B 2 request|awk -F\" '{print $4}'|head -1` ;\
/opt/sas/viya/home/bin/sas-viya configuration configurations delete --id ${my_id} ;\
/opt/sas/viya/home/bin/sas-viya auth logout
This searches for configuration of logging.level.results and deletes the corresponding ID. You should see something like the following:
Enter credentials for https://viya.customer.com:
Login succeeded. Token saved.
The deletion of configuration "571e26ab-cdff-446f-a446-db95fea9cff2" is complete.
Logout succeeded.
This will remove the additional logging.
Conclusion
In this post as a follow on from configuring the SAS Viya environment, we have demonstrated the steps to configure the SCIM client in Azure Active Directory. With these steps complete the user and group information will be pushed from Azure Active Directory into the Identities microservice. You will still need to configure authentication for SAS Logon Manager for these users to be able to access SAS Viya. You can use either SAML or OpenID Connect from Azure Active Directory to SAS Viya. In the next post in the series looking at SCIM, we will look at the same configuration for OKTA.
Ready to join fellow brilliant minds for the SAS Hackathon?
Build your skills. Make connections. Enjoy creative freedom. Maybe change the world. Registration is now open through August 30th. Visit the SAS Hackathon homepage.
Register today!Free course: Data Literacy Essentials
Data Literacy is for all, even absolute beginners. Jump on board with this free e-learning and boost your career prospects.
Get Started
- Find more articles tagged with:
- GEL

